

A guide to help you enable Cloudflare on your domain via cPanel.
1. Log into your cPanel account.
2. In the Software section, click the Cloudflare.

3. Click on Sign in Here to access your Cloudflare account.

4. Under Domain Overview, you can see two options. CNAME Setup and Full Zone Setup. CNAME Setup does not require you to point your DNS nameservers to Cloudflare, and it is easy for you, but If you choose Full Zone Setup, then you need to change your domain nameservers to Cloudflare DNS.

For CNAME Setup: If you choose CNAME Setup, then it will activate to your domain and display status as Active.

For Full Zone Setup: If you choose Full Zone Setup, then it will display nameservers, which you need to set on your domain name.
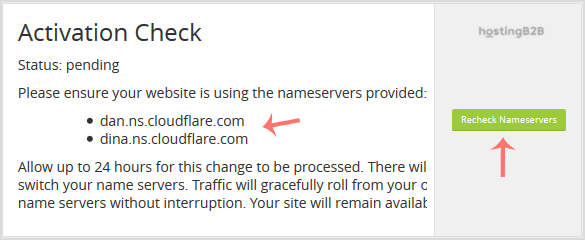
After you update your domain nameserver, wait for a few hours, then log in again to your Cloudflare account, and click on Recheck Nameservers.
You have successfully enabled Cloudflare on your domain via cPanel.
Visit our blog for more knowledgebase articles !
The post How to enable Cloudflare on your domain via cPanel? appeared first on HostingB2B.


