GPU-accelerated workloads — model training, inference serving, video transcoding, scientific computing — have become the backbone of modern infrastructure, and Docker remains the standard way to package and ship them. Yet containers are isolated from host hardware by design, so understanding how to use GPU in Docker correctly is a prerequisite for anyone running workloads in production on dedicated AI Hosting or HPC clusters. This guide explains the full workflow conceptually — from driver installation to Compose orchestration — and shows how it maps onto the dedicated GPU servers available at HostingB2B.
Why GPU Access in Containers Isn’t Automatic
A standard Docker container sees a virtualized filesystem and namespaced processes, but it has no inherent visibility into the host’s graphics devices, CUDA driver libraries, or the kernel modules NVIDIA hardware requires. Installing CUDA inside an image accomplishes nothing on its own if the container runtime cannot reach the physical GPU.
The working solution consists of three layers:

- Host NVIDIA driver — installed once on the bare-metal server or virtual machine
- NVIDIA Container Toolkit — the bridge that injects driver libraries and device nodes into containers at runtime
- CUDA-enabled images — containers built on NVIDIA’s official base images
Once these layers are in place, how to use GPU in Docker becomes a matter of a single runtime flag and a short configuration block rather than a systems-engineering project.
Deploy vLLM on a Dedicated GPU Server Today
Ready to move from testing to production? Deploy vLLM on a dedicated GPU server: explore H100 GPU server options or scale with dual V100S GPU nodes.
Explore AI HostingStep 1: Docker GPU Setup on Ubuntu
Ubuntu is the most widely used host OS for GPU workloads, and it’s the default we recommend and provision on HostingB2B GPU servers. A clean docker GPU setup Ubuntu workflow begins entirely at the host level, before Docker enters the picture.
First, the proprietary NVIDIA driver is installed through Ubuntu’s official driver management tooling, followed by a reboot. Verification is essential at this stage: the host must be able to report the GPU model — an A100 40GB or L40S 48GB, for instance — along with the driver and supported CUDA versions. If the host cannot see its own GPU, nothing downstream will work, and troubleshooting should stop here until it does.
Second, Docker Engine itself is installed from Docker’s official repository. We advise against the snap-packaged distribution of Docker on GPU hosts, as its confinement model complicates device access and produces failures that are notoriously hard to diagnose.
Step 2: NVIDIA Container Toolkit Install
The NVIDIA Container Toolkit install is the pivotal step that most teams underestimate. The toolkit — the modern successor to the legacy nvidia-docker2 wrapper — registers itself with Docker’s runtime interface and takes responsibility for everything a container needs to talk to the GPU: mounting device nodes, mapping the host’s driver libraries into the container filesystem, and exposing utility binaries.
The process itself is straightforward: NVIDIA’s package repository is added to the system’s trusted sources, the toolkit package is installed, Docker’s configuration is updated to register the NVIDIA runtime, and the Docker daemon is restarted. The architectural payoff of a correct NVIDIA Container Toolkit install is significant — GPU drivers never need to be baked into container images. The host owns the driver; the toolkit lends it to any container on demand. This separation is what keeps images portable across servers and driver upgrades safe.
Step 3: Granting Access with Docker Run –gpus All
With the toolkit configured, exposing hardware to a container comes down to one runtime option. The docker run –gpus all flag instructs Docker to grant the container access to every GPU present on the host — the standard choice for single-GPU machines and for data-parallel jobs that consume the whole machine.
On multi-GPU hardware, more granular control is available. Instead of “all,” an operator can specify an exact number of GPUs or address individual devices by index or UUID. On our dual-GPU V100S server, for example, this makes it possible to pin one card to a latency-sensitive inference service while reserving the second for batch training — eliminating resource contention between workloads without any virtualization overhead.
Step 4: Check GPU Inside Container
Passthrough should never be assumed to work — the correct habit is to check GPU inside container before deploying anything real, especially in production environments tailored for LLM Hosting. Verification is best approached in three levels of depth:
- Device visibility. Launch a minimal CUDA container and confirm it can enumerate the GPU through NVIDIA’s system management interface. This proves the driver plumbing is mounted.
- Framework-level check. Run a probe inside a PyTorch or TensorFlow container asking the framework whether CUDA is available and which device it sees. This proves the CUDA libraries in the image are compatible with the host driver.
- Compute sanity test. Execute a small real workload and watch utilization actually rise, confirming the GPU is doing work rather than merely being visible.
The most common failure pattern deserves a mention: the management interface works inside the container, yet the ML framework reports no CUDA device. This almost always means the image was built against a CUDA version newer than the host driver supports. The fix is not to touch the container at all, but to either upgrade the host driver or select an image built against an older CUDA release.
Step 5: Building Your Own Images — a CUDA Docker Image Tutorial in Principles
Most teams eventually outgrow off-the-shelf images, so a conceptual CUDA Docker image tutorial is worth internalizing even without touching a Dockerfile line by line. Three principles govern production-grade CUDA images:
- Choose the right base variant. NVIDIA publishes its official images in tiers: a minimal base tier with only the runtime stub, a runtime tier adding the CUDA libraries and cuDNN, and a devel tier including compilers and headers. Development and custom-kernel builds need the devel tier; production serving should use runtime — the size difference is measured in gigabytes and directly affects deployment speed.
- Pin versions explicitly. Every image should reference an exact CUDA and OS version. Floating “latest” tags were deliberately retired by NVIDIA precisely because unpinned CUDA versions silently break deployments after rebuilds.
- Keep drivers out of the image. Drivers belong to the host; the Container Toolkit injects them at runtime. An image with a bundled driver breaks the moment the host is upgraded — the anti-pattern behind a large share of GPU-container incidents.
Step 6: Docker Compose GPU Configuration
Real deployments are rarely a single container. An inference API, a queue worker, a vector database, and a monitoring agent typically run as one stack — which is where declarative docker compose gpu configuration comes in. Modern Compose files describe GPU requirements in a dedicated resource-reservation section: the operator states which driver the service needs, how many devices, and optionally which specific device IDs.
This declarative pattern is what we recommend standardizing on. On a dual-GPU machine, assigning each service its own device ID gives clean isolation and predictable memory budgets, all version-controlled alongside the application code. The older approach of setting a special runtime per container still functions but is considered legacy; the resource-reservation syntax is portable across Compose and orchestrators and survives tooling upgrades.
GPU Passthrough for Virtualized Environments
Everything above assumes containers running directly on bare metal. Many HostingB2B clients, however, run Proxmox — one of the default OS options on our GPU servers — and layer virtual machines on top. In that architecture, a GPU passthrough docker container setup involves two distinct stages.
In the first stage, the physical GPU is handed from the hypervisor to a virtual machine: the server’s IOMMU capability is enabled in firmware and kernel settings, the GPU is detached from the host and bound to the passthrough subsystem, and the card is attached to the VM as a native PCIe device. From that moment the VM sees the GPU as its own physical hardware.
In the second stage, the standard workflow simply repeats inside the VM — driver, toolkit, container runtime access. A GPU passthrough Docker container thereby inherits the VM’s hardware-level isolation boundary while retaining container-level portability. Full PCIe passthrough delivers near-native performance with no vGPU licensing costs, which is why it’s the preferred model for regulated workloads — iGaming analytics, fintech risk modeling — where tenant isolation must be provable. Our recommendation: dedicate the entire GPU to a single VM rather than attempting hardware slicing unless the workload profile genuinely demands it.
Running This on HostingB2B GPU Servers
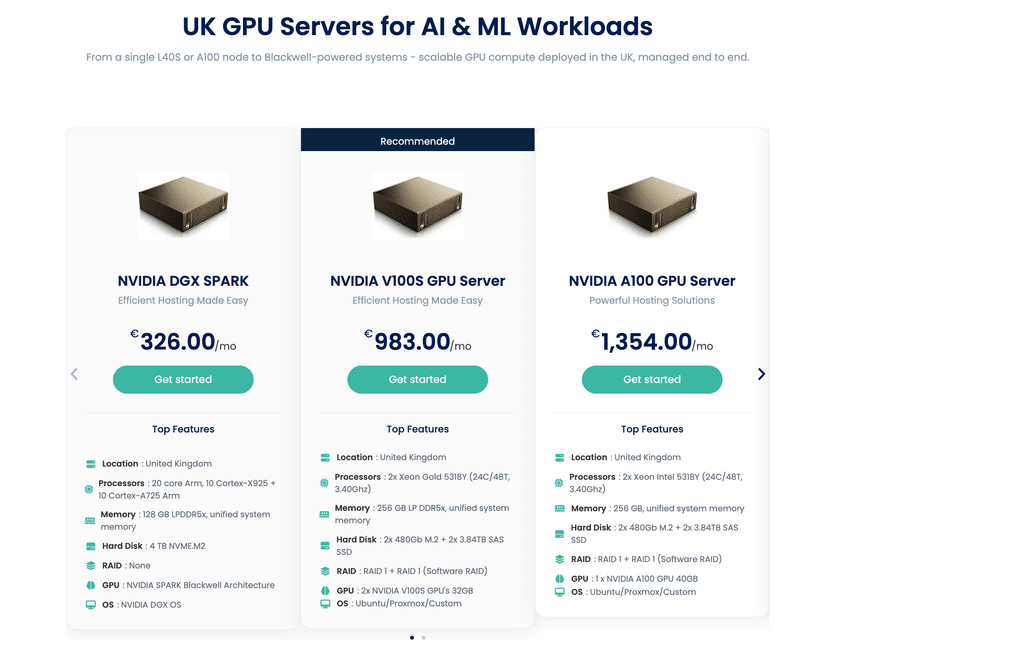
Knowing how to use GPU in Docker is only half the equation — the hardware underneath determines what your containers can achieve. HostingB2B offers four UK-hosted GPU configurations, deployable with Ubuntu, Proxmox, or a custom OS, all suited to the workflow described above:
NVIDIA DGX Spark — from €326/month. A compact Blackwell-architecture system with a 20-core Arm CPU (10× Cortex-X925 + 10× Cortex-A725), 128 GB of LPDDR5x unified memory, 4 TB NVMe storage, and NVIDIA DGX OS. The unified memory model is the standout: containers can address models larger than a discrete GPU’s VRAM would allow. Its Arm architecture means container images must be pulled in arm64 or multi-arch variants. Ideal for prototyping, fine-tuning, and edge inference at an entry-level price.
NVIDIA V100S GPU Server — from €983/month. Dual Xeon Gold 5318Y processors (24C/48T each at 3.40 GHz), 256 GB of memory, mirrored boot and data storage (RAID 1 + RAID 1), and two V100S 32GB GPUs. The dual-GPU layout pairs naturally with per-device Compose pinning — training on one card, inference on the other, or both cards together for data-parallel jobs.
NVIDIA A100 GPU Server — from €1354/month. The same dual-Xeon, RAID-protected platform equipped with one A100 40GB. The A100’s Multi-Instance GPU capability allows the card to be partitioned into isolated instances — effectively several smaller GPUs for concurrent containerized services. The workhorse choice for serious training and high-throughput inference.
NVIDIA L40S GPU Server — from €1520/month. The identical platform with one L40S 48GB — the largest VRAM in the lineup. The L40S excels at mixed workloads: LLM inference, rendering, video pipelines, virtual workstations. More memory means fewer out-of-memory failures when serving large models in containers.
All rack configurations include redundant storage; the Spark’s single NVMe volume should be paired with off-server backups. We further recommend GPU telemetry exporters feeding a monitoring stack, plus strict firewall and access-control policies from day one.
Closing Recommendations
Mastering how to use GPU in Docker comes down to a disciplined sequence: host driver first, NVIDIA Container Toolkit second, verified access third, and only then production images and Compose stacks. Automate provisioning so every new server is reproducible, monitor utilization to right-size the fleet, and match the hardware tier to the workload — Spark for development, V100S for parallel flexibility, A100 for training density, L40S for memory-hungry inference.
If you’d like a HostingB2B GPU server delivered with the full Docker GPU stack pre-configured and ready to run, our team can handle the provisioning end to end.