Configuring your server’s default nameservers is a fundamental task for managing your web hosting environment. This guide provides a clear, step-by-step process to change default nameservers in WHM with root access. We will cover not only the procedure but also the reasons for this change and how to verify it was successful, ensuring your DNS management is seamless and professional.
Understanding the Role of Default Nameservers
Your server’s nameservers act as a directory, translating human-readable domain names into machine-readable IP addresses. Changing the default nameservers set by your hosting provider is a common step for resellers and server administrators. This update allows you to use custom or private nameservers, which is essential for white-label branding. By using nameservers like ns1.yourbrand.com, you present a more professional and cohesive experience to your clients. This WHM nameserver configuration is a core part of effective Advanced DNS Management.
Essential Prerequisites for Configuration
Before you begin, it is critical to understand that this procedure requires full administrative privileges. You must have root access to your server’s Web Host Manager interface. Standard reseller accounts do not have the necessary permissions to modify server-wide default settings. If you are unsure how to log in with the correct credentials, please review our guide to Access Web Host Manager (WHM) first.

How to Change Default Nameservers in WHM
Follow these four steps carefully to update your server’s default nameservers. This process takes place within the Basic WebHost Manager Setup area, a central location for server-wide settings.
- Login to your WHM Root Account
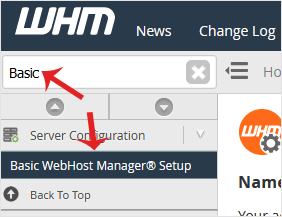
Navigate to your WHM login URL and enter your root username and password to access the main dashboard. - Navigate to Basic WebHost Manager Setup
In the left-hand navigation menu, find the Server Configuration section. Alternatively, you can type “Basic WebHost” into the search bar at the top of the page. Click on the Basic WebHost Manager® Setup link to proceed.
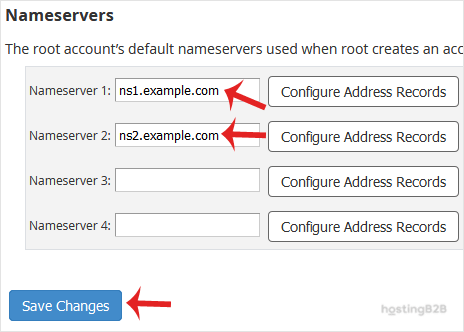
- Enter Your New Nameservers
Scroll down to the bottom of the page where you will find the Nameservers section. You will see several text fields, typically labeled Nameserver 1, Nameserver 2, and so on. Enter your desired primary and secondary nameservers into these fields. Ensure they are entered correctly as fully qualified domain names, such as ns1.yourdomain.com and ns2.yourdomain.com. - Save Your Configuration
After entering the new nameserver information, click the Save Changes button at the bottom of the page. WHM will apply the new configuration across the server.
Verifying Your New Nameserver Settings
After you update server nameservers, the changes are not instant. This is due to a process called DNS propagation, which can take anywhere from a few hours to 48 hours to complete globally. You can use external tools like a WHOIS lookup service to check if the new nameservers are correctly associated with your domains. Patience is key during this period as internet service providers worldwide update their cached records.
Advanced DNS and Server Management
Changing default nameservers is often just one part of a larger server management strategy. For those running a reseller business, our WHM Reseller Hosting solutions provide the power and flexibility you need. If you require a more robust and globally distributed DNS infrastructure, consider our Managed DNS Hosting services. For next steps, learn how to set your custom private nameserver in WHM and always prioritize security by following our guide to Secure Your Dedicated Server.
Frequently Asked Questions
A nameserver is a specialized server on the internet that handles queries about the location of a domain name’s various services. It acts like a phonebook for the internet, translating domain names like hostingb2b.com into the IP addresses that computers use to connect to websites and other services.
Changing the default nameservers is a server-wide setting that affects all accounts created on that server. Only the root administrator has the authority to make such fundamental changes to the server’s core configuration. Reseller access is limited to managing individual accounts within the server’s existing framework.
The process, known as DNS propagation, can take up to 48 hours to complete worldwide. While many users will see the change within a few hours, you should allow for the full propagation period before all traffic is reliably routed through the new nameservers.
You must use a fully qualified domain name (FQDN). A typical format is ns1.yourdomain.com and ns2.yourdomain.com. Do not enter IP addresses or incomplete names in these fields.
Yes, using your own domain for nameservers is called creating private or custom nameservers. This is highly recommended for branding purposes, especially for reseller hosting. It requires additional configuration at your domain registrar to register the nameservers as glue records.