A professional email signature reinforces your brand and provides key contact information with every message you send. Setting a custom signature on your Android device ensures your communications maintain a consistent and polished appearance even when you are away from your desk. This guide provides a clear path to configure your mobile signature in the built-in Android email application.
Before you begin, ensure you have already configured your email. If you need assistance, please follow our guide to add a cPanel email account to your Android Mobile.
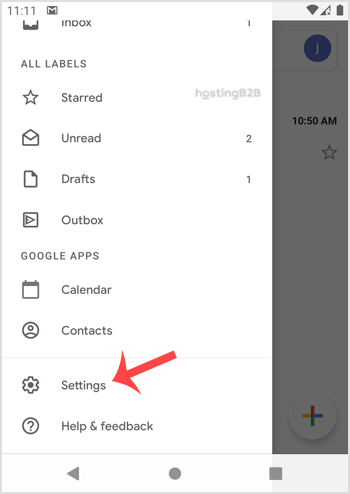
Step-by-Step Guide to Setting Your Android Signature
Follow these simple instructions to add or update the signature for your email account in the native Android email client. The process is straightforward and takes only a few moments to complete.
- Open Your Email Application
Locate and tap the default Email icon on your device’s home screen or app drawer to open your inbox.
- Access the Settings Menu
Tap the Menu icon, often represented by three horizontal lines in the top-left corner of the screen. From the menu that appears, select the Settings option. - Select the Correct Email Account
In the settings area, you will see a list of all email accounts configured on your device. Tap on the specific account for which you want to set a signature. - Navigate to the Signature Option
Scroll through the account settings and tap on the entry labeled Mobile Signature or Signature. - Create and Save Your Signature
A text box will appear. Enter your desired signature here. Once you are satisfied with the text, tap OK or Save to apply the changes.

Your new signature is now active. It will be automatically appended to every new email and reply you send from this account on your Android device, providing a consistent and professional closing.

Managing Signatures for Multiple Accounts
If you manage several email addresses on your device, such as for different projects or business units, the Android email app offers the flexibility you need. You can set a unique signature for each email account by repeating the steps above for every account listed in the settings menu. This feature helps you maintain distinct professional identities across all your communications.
Best Practices for Professional Mobile Signatures
A mobile signature should be informative but concise. Screen space is limited, so prioritize the most important information. A good mobile signature typically includes your name, title, company, and a phone number or website link. Avoid large blocks of text or complex formatting, as they may not render correctly on all devices. For more advanced email requirements, consider exploring our Business Email Hosting solutions which offer enhanced features and reliability.
Frequently Asked Questions
The default Android email client typically has limited support for HTML formatting and does not allow images directly in the signature settings. For rich signatures, you may need to use a different email application like Gmail or Outlook, which offer more advanced options.
First, double-check that you saved the signature correctly by navigating back to the signature setting for the correct account. If it is saved but still not appearing, try closing and reopening the email application. In some cases, a device restart can resolve caching issues.
A signature set on your Android device is stored locally and only applies to emails sent from that specific device. A signature configured in webmail, such as when you access your email via cPanel Webmail, applies only to emails sent from the web interface. You must configure them separately to ensure consistency.
No, these instructions are specifically for the built-in or native Android email application. The Gmail and Outlook apps have their own settings menus where you can configure signatures. The process is similar but the menu locations will differ.
Android interfaces can vary slightly between device manufacturers and software versions. If you cannot find the signature option, look for it under a general “Composing and sending” or “Account settings” section. If you continue to have trouble, please do not hesitate to contact our support team for assistance.