Properly managing database access is fundamental to your website’s security and performance. When an application needs to interact with its database, it requires a dedicated user with specific permissions. This guide provides a complete walkthrough for assigning a user to a MySQL database and managing its privileges directly within cPanel.
Understanding Database Users and Privileges
Before proceeding, it is important to distinguish between a cPanel user and a database user. Your cPanel account provides access to your hosting control panel. A MySQL database user, on the other hand, is a separate credential used exclusively by your applications to access a specific database. Privileges are the set of rules that define what actions this user can perform, such as reading, inserting, or deleting data. Effective privilege management ensures your application has the access it needs without exposing your data to unnecessary risks.
Prerequisites Before You Begin
This guide assumes you have already created both the MySQL database and the MySQL user you wish to connect. If you have not completed these initial steps, you will need to do so before you can assign privileges. We have detailed guides to help you with each task.

- First, follow the prerequisite step of creating a MySQL Database.
- Next, learn how to create a database Username in cPanel.
Once you have both a database and a user ready, you can proceed with the steps below to link them and assign the correct permissions.
Assign a User to a Database in cPanel Step-by-Step
Follow this straightforward process to connect your database user to a database and configure its access level. This entire procedure is handled within the cPanel interface, making it quick and easy to manage.
Step 1. Log into cPanel and Navigate to MySQL Databases
First, you need to access your hosting control panel and locate the database management tool.
- Log into your cPanel account.
- In the main dashboard, find the Databases section.
- Click on the MySQL Databases icon to open the management interface.

Step 2. Assign the User to the Database
Now you will find the section that allows you to create the connection between the user and the database.
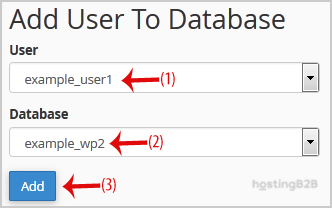
- Scroll down the page until you find the Add User to Database section.
- From the User dropdown menu, select the database user you created earlier.
- From the Database dropdown menu, choose the database you want to grant access to.
- Click the Add button to proceed to the privilege management screen.
Step 3. Manage User Privileges
In this final step, you define exactly what the user is allowed to do within the database. This is a critical step for ensuring your application functions correctly while maintaining security.
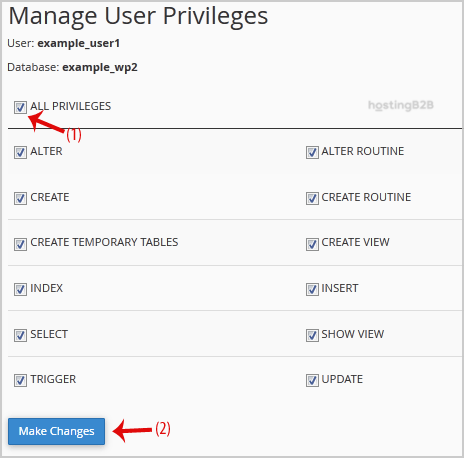
- You will now be on the Manage User Privileges page.
- For most common web applications like WordPress, you can select the ALL PRIVILEGES checkbox. This grants the user full control over the database.
- Click the Make Changes button to save the permissions.

After completing these steps, you have successfully added the user to the database and granted the necessary privileges. Your application can now use these credentials to connect and interact with its data.
Best Practices for Database User Security
While granting all privileges is common for simplicity, the most secure approach is to follow the principle of least privilege. This means giving a user only the permissions it absolutely needs to function. For custom applications, you might only need to grant SELECT, INSERT, and UPDATE permissions. Carefully consider your application’s requirements to minimize potential security vulnerabilities. For a deeper understanding of protecting your data, explore these common database security risks and solutions. A well-configured database is the foundation of our secure and reliable Web Hosting solutions.
Frequently Asked Questions
MySQL privileges are permissions that control what actions a specific user can perform on a database. Examples include SELECT (read data), INSERT (add data), UPDATE (modify data), and DELETE (remove data). Granting specific privileges helps secure your database.
No, not always. While many standard applications require it, the best security practice is the principle of least privilege. This means only granting the specific permissions an application needs to function. Granting ALL PRIVILEGES should be reserved for users that genuinely require full administrative control over the database.
In the cPanel MySQL Databases tool, scroll down to the “Current Databases” table. In the “Privileged Users” column next to the relevant database, click the trash icon next to the user you wish to remove. Confirm the action to revoke all privileges for that user on that database.
Yes. You can repeat the “Add User to Database” process for the same user with different databases. This allows a single user to access multiple databases, with privileges for each one managed independently.
A cPanel user is what you use to log into your main hosting control panel to manage files, domains, and email. A database user is a separate credential created specifically for an application to access a MySQL database. They are not interchangeable.