Creating packages in WebHost Manager (WHM) is a fundamental step to streamline and automate your hosting operations. Predefined packages save you valuable time by setting consistent resource limits and features for new accounts, eliminating repetitive manual configuration. This is especially critical for businesses managing multiple websites or offering Reseller Hosting plans.
This guide provides a clear, step-by-step process to create a package in WHM, explaining each resource and setting so you can configure your offerings with confidence.
What Are WHM Packages and Why Use Them?
A WHM package is a template that defines the specific resources and permissions allocated to a cPanel hosting account. Instead of manually setting disk space, bandwidth, email accounts, and other features every time you create a new account, you simply assign a pre-configured package. This ensures consistency across your accounts, simplifies management, and makes scaling your hosting services much more efficient.

How to Create a Package in WHM Step by Step
Follow these instructions carefully to configure and add a new hosting package within your WHM interface. Each step includes explanations to help you make informed decisions about your server’s resources.
- Login to Your WHM Account
First, access your WebHost Manager dashboard using your administrator credentials. This is typically done by navigating to your server’s IP address or hostname followed by port 2087. - Navigate to the Add a Package Page
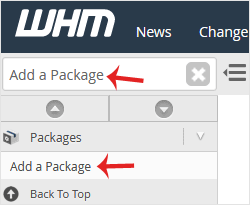
In the WHM dashboard, use the search bar on the left-hand side and type “Add a Package”. The option will appear under the “Packages” section. Click on it to proceed to the package creation screen.
- Define the Package Name and Resources
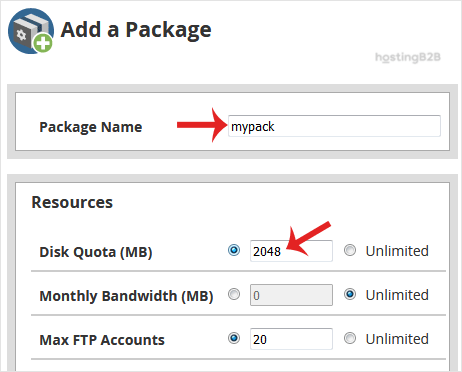
This section is where you set the core resource limits for your package. It is crucial to allocate these resources carefully based on the needs of your clients and the capacity of your server.- Package Name Enter a descriptive name for your package, such as “Basic”, “Business”, or “Premium”.
- Disk Quota (MB) The total amount of disk space the account can use.
- Monthly Bandwidth (MB) The amount of data transfer allowed per month. You can learn more about how to limit bandwidth usage for specific accounts.
- Max FTP Accounts The maximum number of FTP users the account can create.
- Max Email Accounts The total number of email addresses allowed.
- Max Addon Domains The number of additional domains that can be hosted on the account.
- Max Parked Domains The number of domains that can be pointed to the primary domain.
- Max Subdomains The maximum number of subdomains the account can create.

- Configure Package Settings
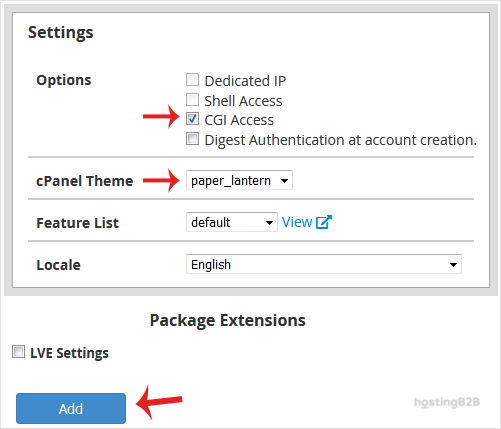
Here you will define the specific features and permissions for the package. These settings control access to advanced functionalities.- Dedicated IP Check this box if you want to assign a unique IP address to each account created with this package. This is often used for SSL certificates or specific application requirements.
- Shell Access This option grants users SSH access to the server. For security reasons, we strongly recommend leaving this unchecked unless the user is an advanced developer who explicitly requires it. Granting shell access can introduce security vulnerabilities if not managed properly.
- cPanel Theme Choose the visual theme that cPanel users will see when they log in.
- Feature List This is a powerful option that controls which cPanel features are available to the user. You can create a Feature List in WHM to build custom permission sets, for example, disabling features that you do not want your clients to use. If you have not created a custom list, you can leave this as “default”.

- Click the Add Button
Once you have reviewed all the resource limits and settings, click the “Add” button at the bottom of the page. WHM will save the configuration, and your new package is now ready to be assigned to new or existing accounts.
Congratulations, you have successfully created a WHM package. You can repeat this process to create multiple package tiers for different customer needs.
Next Steps After Creating Your Package
With your new package created, you can now put it to use. The most common next steps are to assign it to a new account or modify it later as your needs change. You can easily create a new cPanel account and select your package from the dropdown list during setup. If you ever need to adjust the resource limits, you can also edit a hosting package at any time.
Frequently Asked Questions
Yes, you can delete a package from the “Delete a Package” page in WHM. However, you cannot delete a package that is currently assigned to one or more hosting accounts. You must first change the package for those accounts before you can remove it.
When an account reaches its disk quota or bandwidth limit, its services may be suspended automatically until the next month or until the limits are upgraded. The website might become inaccessible, and email services could stop working.
You can change the package for an existing account by navigating to “Modify an Account” in WHM. Select the account you wish to change, and you will see an option to choose a new package from a dropdown list. Save the changes to apply the new resource limits.
A Feature List is a collection of permissions that determines which tools and functions are available inside a user’s cPanel account. Creating custom feature lists allows you to tailor your hosting packages by enabling or disabling specific functionalities, such as advanced DNS editors or backup tools.
No, a dedicated IP is not necessary for most standard hosting packages. Modern hosting environments use Server Name Indication (SNI) technology, which allows multiple SSL certificates to operate on a single shared IP address. A dedicated IP is typically only required for specific applications or advanced security needs.