Creating a dedicated FTP account in Plesk is an essential task for securely managing your website files. Whether you need to grant access to a developer or simply want a streamlined way to upload content, a properly configured FTP account provides controlled access to your server. This guide provides a complete walkthrough to create, configure, and manage your Plesk FTP accounts effectively.
Step-by-Step Guide to Creating a Plesk FTP Account
Follow these precise steps to configure a new FTP user within your Plesk control panel. This process gives you granular control over file access, which is fundamental for maintaining a secure hosting environment. All these actions depend on our secure web hosting solutions providing the Plesk interface.
- Log In to Plesk
First, you need to access your control panel. If you are unsure how, you can follow our guide to log in to Plesk. - Navigate to Websites & Domains
Once logged in, locate the main navigation menu on the left side of the screen. Click on the “Websites & Domains” option to view all your managed domains.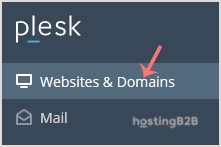
- Select the Correct Domain
Find the specific domain name for which you want to create the FTP account. Click on its name or the control panel area associated with it to open its management dashboard.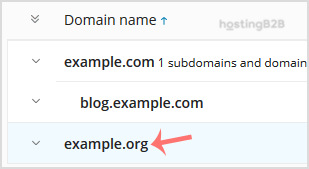
- Open FTP Access Settings
In the domain’s dashboard, look for a section labeled “Files & Databases”. Within this area, click on the “FTP Access” icon to proceed to the FTP account management screen.
- Add a New FTP Account
On the FTP Access page, you will see a list of existing FTP accounts. Click the “Add an FTP Account” button to open the creation form. - Configure the Account Details
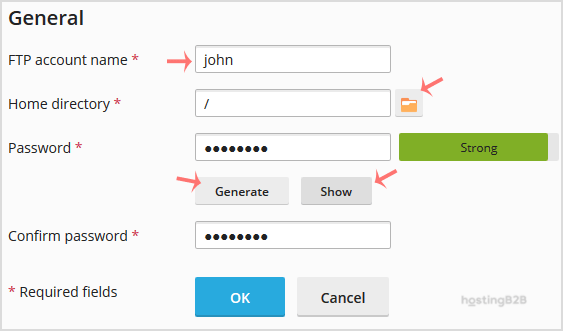
You must now fill in the required information for the new user. Pay close attention to each field to ensure the account has the correct permissions.- FTP account name This will be the username for logging in. For example, you could enter “johndeveloper”.
- Home directory This critical setting defines the user’s top-level folder. To grant access to your entire website’s public folder, use /httpdocs. For more restricted access, specify a subfolder like /httpdocs/staging-area. The user will not be able to navigate outside this specified directory.
- Password Enter a strong, unique password. You can also use the “Generate” button for a secure random password. Be sure to click “Show” and copy the password to a safe location before proceeding.
- Confirm and Save
After filling in all the details, click the “OK” button to create the account. The new user will now appear in your list of FTP accounts.

Understanding Your FTP Connection Details
After creating the account, you need the correct credentials to connect using an FTP client like FileZilla or Cyberduck. The necessary details are standard across most applications and ensure a successful connection to your server.

- Host Use your website’s IP address or your domain name prefixed with ftp, such as ftp.example.com.
- Username The full FTP account name you created in the previous steps.
- Password The password you set or generated for the FTP account.
- The default port for FTP is 21. For a more secure connection using SFTP, you may need to use port 22, depending on your server configuration.
Managing FTP Accounts and Security Best Practices
Properly managing FTP users is a key part of your overall security posture. Creating accounts is just the first step. You should also regularly review who has access and what permissions they hold. For an alternative to FTP, consider using the built-in Plesk File Manager for quick edits.
- Use Strong Passwords: Always enforce the use of complex passwords for all FTP accounts.
- Principle of Least Privilege: Only grant access to the directories a user absolutely needs. Avoid giving full /httpdocs access unless necessary.
- Prefer SFTP over FTP: SFTP (SSH File Transfer Protocol) encrypts both your credentials and the data being transferred, offering superior protection against eavesdropping.
- Remove Unused Accounts: If a developer’s contract ends or an employee leaves, promptly delete their FTP account. You can learn how to remove an FTP account in Plesk to keep your access list clean.
Troubleshooting Common FTP Connection Errors
Even with correct setup, you might occasionally face connection problems. Most issues stem from a few common sources. Before contacting support, check these potential causes to resolve the problem quickly.
- Authentication Failed: This error almost always means an incorrect username or password. Carefully re-type your credentials, paying attention to case sensitivity.
- Connection Timed Out: This often indicates a firewall is blocking the connection. Check your local computer’s firewall and any network firewalls between you and the server.
- Directory Listing Failed: This can happen if the home directory you specified during setup does not exist or has incorrect permissions on the server. Verify the path is correct in your Plesk FTP settings.
Frequently Asked Questions
FTP (File Transfer Protocol) is a standard protocol for transferring files, but it sends data, including your username and password, in plain text. SFTP (SSH File Transfer Protocol) runs over a secure channel and encrypts all data, making it a much safer option for managing your website files.
Yes, Plesk allows you to create multiple FTP accounts for a single domain. This is useful for providing separate, restricted access to different team members or third-party developers, ensuring each user can only access their designated folders.
To change a password, navigate to “Websites & Domains”, click “FTP Access”, and then click on the name of the FTP account you wish to modify. You will see a form where you can enter and confirm a new password.
The default port for standard FTP connections is 21. For secure SFTP connections, the default port is typically 22. Your hosting provider’s configuration determines which ports are open and available for use.
In the “FTP Access” section of your Plesk panel, you will see a list of all FTP accounts. Select the checkbox next to the account you want to remove and then click the “Remove” button. Confirm the action to permanently delete the account.