After you set up a cPanel email account with Outlook 2019, you are ready to start communicating. Using a desktop client like Outlook provides a direct and efficient way to manage your professional correspondence without needing to log into the cPanel webmail interface each time. This guide provides a complete walkthrough on how to send email using Outlook 2019, from composing a new message to managing replies and attachments.
How to Compose and Send a New Email
Sending your first email from the Outlook 2019 application is a straightforward process. Follow these simple steps to compose and dispatch your message. This procedure ensures your email is sent from the correct professional address associated with your hosting account.
- Open the Outlook 2019 Application
Locate and launch the Outlook program on your computer.
- Create a New Message
Navigate to the Home tab on the ribbon menu at the top of the window. Click the New Email icon to open the message composition window.
- Fill in the Message Details
A new window will appear where you can write your email. Pay close attention to the following fields.- From – If you have configured multiple email accounts, click the ‘From’ button to select the correct address you wish to send the email from.
- To – In this field, enter the full email address of the primary recipient.
- Subject – Type a clear and concise subject for your email.
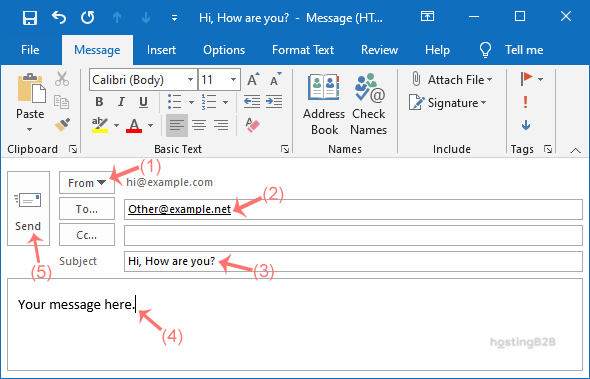
- Write and Send Your Email
Compose your message in the main text box. Once you have finished writing and have reviewed the recipient and subject, click the Send button to deliver your message.
Adding Attachments to Your Message
Often, you will need to send files such as documents, images, or spreadsheets with your email. Outlook makes it easy to attach files from your computer or cloud storage locations. It is important to be mindful of file size limits, as very large attachments may fail to send or be rejected by the recipient’s server.

- In the message composition window, select the Attach File button from the ribbon menu.
- Browse your computer for the file you wish to attach and select it.
- The file will appear listed below the subject line, confirming it is attached and ready to be sent with your message.
Understanding Recipient Fields To CC and BCC
Beyond the primary ‘To’ field, Outlook provides two other options for including recipients. Understanding the difference is essential for professional communication. Using these fields correctly helps manage conversations and protect the privacy of recipients.
- To Use this for the primary recipients who the message is directly addressed to and who are expected to take action.
- CC (Carbon Copy) Use this to send a copy of the email to people for their information, but who are not the primary recipients. All recipients can see who was included in the ‘To’ and ‘CC’ fields.
- BCC (Blind Carbon Copy) Use this to send a copy to someone without the other recipients knowing. This is useful for protecting an individual’s email address or for sending a copy to a third party discreetly.
Replying to and Forwarding Emails
Managing ongoing conversations is a core function of any email client. Outlook provides simple controls for replying to messages you receive or forwarding them to other contacts. These actions help maintain clear communication threads.
- Reply When viewing an email, click the Reply button to send a response only to the original sender.
- Reply All Click Reply All to send your response to the original sender and everyone else included in the ‘To’ and ‘CC’ fields. Use this option with care to avoid sending information to an unnecessarily wide audience.
- Forward Click the Forward button to send a copy of the received email and any attachments to a new recipient who was not part of the original conversation.
Troubleshooting Common Sending Issues
Even with a reliable setup, you may occasionally encounter issues when sending an email. One of the most common problems is a message getting stuck in your Outbox folder instead of being delivered. This can happen due to a temporary loss of internet connectivity or an attachment that is too large. Check your Outbox folder and internet connection first. If problems persist, our expert technical support team is available to assist you. For a fully managed service, consider our professional Business Email Hosting solutions.
Frequently Asked Questions
After you click send, the email will move from your ‘Outbox’ folder to your ‘Sent Items’ folder. If the email remains in the Outbox, it has not been sent yet. The presence of the email in the Sent Items folder confirms successful delivery from your client.
CC stands for Carbon Copy, and BCC stands for Blind Carbon Copy. When you CC someone, all other recipients can see their email address. When you BCC someone, their email address is hidden from all other recipients, providing a layer of privacy.
An email can get stuck in the Outbox for several reasons, most commonly a lost internet connection, an incorrect server setting, or an attachment that exceeds the server’s size limit. Check your connection first, then verify the attachment size.
Open the email you wish to forward. On the Home tab in the ribbon menu, click the ‘Forward’ button. A new message window will open with the original email’s content. Enter the new recipient’s address in the ‘To’ field and click ‘Send’.
To reply only to the sender, open the email and click the ‘Reply’ button. To reply to the sender and all other listed recipients, click the ‘Reply All’ button. Type your message and click ‘Send’.
Yes, you can create one or more personalized signatures. Go to File > Options > Mail > Signatures. Here you can create, edit, and set default signatures for new messages and replies or forwards.