Tired of a cluttered inbox or manually sorting messages? Creating a user-level email filter in cPanel gives you precise control over your incoming mail. This powerful tool allows you to automatically discard spam, forward important messages, or organize emails into specific folders, saving you valuable time and improving your workflow. This guide provides a clear, step-by-step process for setting up and managing your own custom email rules.
Understanding cPanel Email Filter Components
Before creating a filter, it helps to understand its basic parts. Every filter you create in cPanel consists of rules that define a condition and an action to be performed when that condition is met. By combining different rules and actions, you can build a robust system for cPanel email management. For example, a rule could check if an email’s subject contains the word “Invoice” and the corresponding action could be to move it to a “Finances” folder.
Step-by-Step Guide to Create Your First Email Filter
This process allows you to set up filters for any individual email address you have configured on your hosting account. Make sure you have already used the tools to create a new email account in cPanel before proceeding.

- Log into your cPanel account.
- Navigate to the Email section and click the Email Filters icon.

- Under the Filters by Users heading, you will see a list of your email accounts. Find the account you wish to configure and click the Manage Filters link next to it.

- Click the Create a New Filter button to begin.
- In the Filter Name text box, enter a descriptive name for your new rule. For instance, “Block Unwanted Newsletters” or “Forward Urgent Alerts”.
- Configure the filter Rules. This section determines what the filter looks for. You can select from many options, such as the email’s subject, body, or sender address. Then, choose an operator like “contains” or “equals”.
- Define the Actions. This tells cPanel what to do with an email that matches your rule. Common actions include discarding the message, redirecting it, or delivering it to a specific folder.
- Once you are satisfied with your rule and action, click the Create button to activate the filter.
Practical Examples of cPanel Email Filter Rules
The real power of cPanel email filters comes from combining rules and actions to meet your specific needs. While a simple filter can block spam, more advanced setups can automate complex workflows. Here are a few common use cases to get you started.
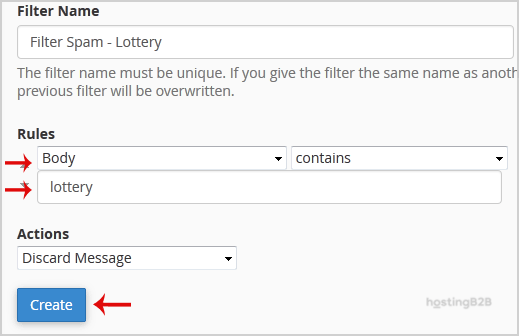
Example 1: Discarding Spam Messages
To automatically delete emails containing common spam phrases, you can set up a discard rule. This is an effective way to block spam in cPanel without it ever reaching your inbox.
- Rule Set the first dropdown to Body.
- Operator Set the second dropdown to contains.
- Value In the text box, enter a word you often see in spam, such as “Lottery”.
- Action From the Actions list, select Discard Message.
Example 2: Forwarding Important Emails
If you need to ensure certain messages reach a colleague or a different inbox immediately, you can set up a forwarding rule. This is useful for team collaboration or managing alerts on the go. You can also use this to forward emails to another address like a personal Gmail account.
- Rule Set the first dropdown to From.
- Operator Set the second dropdown to equals.
- Value Enter the specific email address of an important sender.
- Action From the Actions list, select Redirect to Email and enter the destination address.
Example 3: Sorting Invoices into a Folder
Keep your main inbox clean by automatically filing recurring emails like invoices or receipts. First, ensure you have created the destination folder within your email account.
- Rule Set the first dropdown to Subject.
- Operator Set the second dropdown to contains.
- Value Enter a keyword that consistently appears in the subject, such as “Invoice”.
- Action From the Actions list, select Deliver to Folder and choose the appropriate folder.
How to Manage Your Existing Email Filters
Your email needs may change over time, and cPanel makes it easy to adjust your filters accordingly. From the same Manage Filters screen where you create new rules, you can see a list of all active filters for that email account. Here, you have options to test, diagnose, or edit existing email filters. You can also delete any rules that are no longer needed. For more advanced spam protection, we recommend you Enable Apache SpamAssassin, which works alongside your custom filters. If you find that managing email rules is becoming too complex, consider upgrading to a professional Business Email Hosting solution for advanced security and support.
Frequently Asked Questions
Here are answers to some common questions about managing email filters in cPanel.
User-level filters, as described in this guide, apply only to a single, specific email address. Global email filters apply to all email accounts created under your cPanel account, providing a way to set sitewide rules.
Yes. You can add multiple rules to a single filter by clicking the “+” button next to the first rule. You can then specify whether an email must match “and” (all rules) or “or” (any rule) to trigger the action.
cPanel processes filters in the order they are listed on the Manage Filters page. If an incoming email matches a filter with a “Stop Processing Rules” action, no subsequent filters will be applied to that message.
The “Discard Message” action permanently deletes the email upon arrival without sending any failure notice to the sender. Use this action with caution, as discarded messages cannot be recovered.
Both tools are useful. SpamAssassin uses sophisticated algorithms to score and identify spam automatically. Email filters are best for creating very specific, custom rules based on your own criteria. Using them together provides the most comprehensive protection.