Deploying a powerful multi-user and multi-blog platform like LifeType is a straightforward process with the right tools. This guide provides a clear, step-by-step walkthrough to help you install LifeType using the Softaculous App Installer directly within your cPanel hosting environment. Follow these instructions to get your new blog up and running quickly and securely.
Locating LifeType in Softaculous
The first stage of the installation involves navigating through your cPanel dashboard to find the LifeType application within the Softaculous library. This process is designed to be simple and requires just a few clicks.
- First you must log into your cPanel account using the credentials provided by your hosting provider.
- Once logged in find the Software section on the main cPanel page. Click on the Softaculous App Installer icon to proceed. This tool simplifies the installation of hundreds of web applications.

- You will be redirected from cPanel to the main Softaculous dashboard. This interface manages all your application installations.
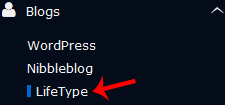
- Look at the navigation menu on the left side of the screen and locate the Blogs category. Click it to expand the list of available blogging platforms.
- From the expanded list click on the LifeType link. This will take you to the application’s overview page where you can begin the installation.
- On the LifeType overview page click the prominent Install button to move to the configuration screen.
Configuring Your LifeType Installation
With the installer ready you now need to provide some essential details about your new website. Correctly configuring these settings ensures your LifeType blog is set up on the right domain with secure administrator access.

Software and Site Settings
This section defines where your LifeType installation will live and what it will be called.
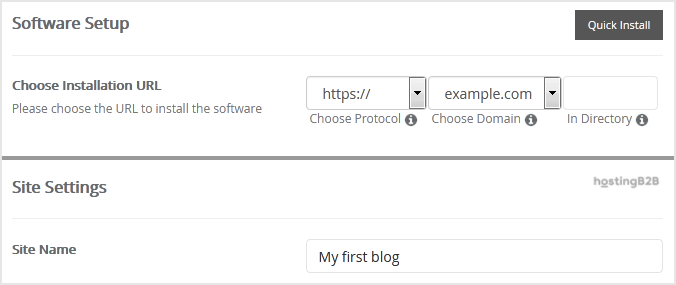
- Choose Installation URL Select the correct protocol (http or https) and domain name from the dropdown menus. In the In Directory field you can specify a subfolder for the installation. For example entering ‘blog’ would install LifeType at yourdomain.com/blog. To install it on your main domain leave this field empty.
- Site Name Enter the name for your new website. This will be visible to your visitors and can be changed later.
Administrator Account Setup
Creating a secure admin account is vital for protecting your website. Avoid using default usernames to enhance security.
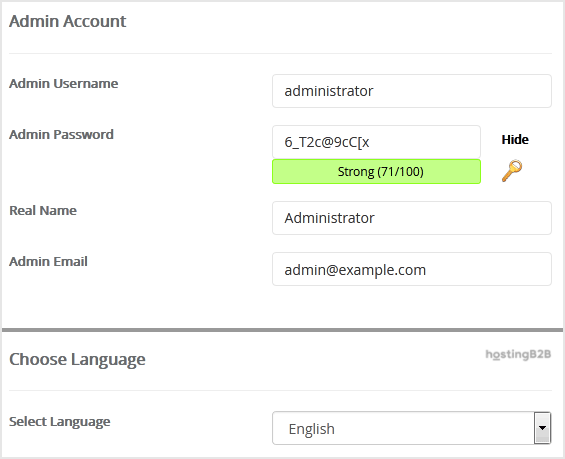
- Username Choose a unique username for your LifeType administrator account. For security reasons do not use common names like ‘admin’ or ‘administrator’.
- Password Create a strong and complex password. We recommend using a combination of upper and lower-case letters numbers and symbols. A secure password is your first line of defense.
- Real Name You can leave this as the default value or enter your actual name.
- Email Provide a valid email address. This address will be used for password resets and important notifications from your LifeType installation.
Important Note Be sure to copy your new admin username and password and store them in a secure location. You will need these credentials to access the LifeType admin dashboard after the installation is complete.
Language Selection
Before proceeding you can select the primary language for your LifeType blog. The default is English but you can choose another option from the dropdown menu if needed.
Completing the Setup
With all the necessary information entered you are ready to finalize the installation. The last step involves reviewing advanced options and starting the automated setup process.
- Advanced Options You can expand this section to customize the database name or configure automated backups. For most users the default settings are sufficient. Be aware that frequent automated backups can consume significant disk space on your hosting plan.
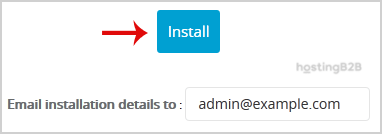
- Finally scroll to the bottom of the page and click the Install button one last time.
Softaculous will now automate the installation process. This typically takes less than a minute. Once it is finished you will see a success message confirming that LifeType has been installed.
Post-Installation Next Steps
Congratulations you have successfully installed LifeType. Your work is not quite done yet. The next crucial step is to log into your new admin area to begin configuring your blog. The success page will provide a link to your new website and another link to the administrative backend. Use the username and password you created during setup to access the admin area and start exploring the features of your new multi-user blog platform. From there you can create new blogs manage users and customize your site’s appearance.
For enhanced security we also recommend you Use a strong password and other security measures for your main cPanel account.
Frequently Asked Questions
LifeType is an open-source blogging platform that supports multiple blogs and users within a single installation. It is a flexible solution for communities or individuals who need to manage several distinct blogs from one central dashboard.
No you do not. Using the Softaculous App Installer automates the entire process. As long as you can follow the steps in this guide you can complete the installation without any coding or database management knowledge.
Yes you can install LifeType on a subdomain or in a subdirectory to test it before moving it to your main domain. Just specify the desired location in the “In Directory” field or choose a subdomain from the “Choose Domain” dropdown during the setup process.
After installing LifeType you should log into the admin dashboard immediately. Your first tasks should be to familiarize yourself with the interface review the default settings and perhaps change your password to something new as an added security precaution.
Softaculous can also help manage updates for your LifeType installation. You can configure it to notify you when new versions are available. Regularly updating the platform and any plugins or themes you use is one of the most important steps for maintaining a secure website.